WordPress footer can be one of the most complex things to figure out and WordPress is one of the best platforms out there to build websites they don’t really explain all to well how to edit it. It’s well suited to host almost any kind of website that you can imagine.
It’s also a big reason why millions of websites have come to light recently and are currently being used. Now knowing this WordPress has given users the possibility to establish themselves online which has never been so easy. But with so many features, amazing tools, and options.
It can sometimes be quite difficult to make sure everything on your site is how you want it to be especially the footer. If you still would like some help feel free to contact us. We’re professionals in the space and would be happy to help.
So if you’re not a pro, and someone who’s looking to fix their problem. We’re here to the rescue to help! Today we’re going to explain one of the basic but most essential issues you might face building a WordPress website. How to edit the WordPress footer section of your theme? If you need help with how to change your WordPress theme learn how here.
You’re about to find out and you’ll walk away from this post knowing how I’ll be showing you each option. Then how to achieve the results you want in a very detailed tutorial down below. Before we get into the meat and potatoes I want everyone on the same page, so below will be a brief introduction. This tutorial is using the basic WordPress initial setup. If you are using Elementor, Beaver Builder, WP Bakery or other WordPress page builders this may not apply. But you can still check to see if this helps.
If you need help on how to install Elementor we have a tutorial here.
What Is A WordPress Footer?
The Footer is simply a term to describe the bottom of a web page. Typically it contains information about copyright, privacy policy as well as some credits. The footer may also include some lines of code and script that sometimes a developer would include.
Sometimes most themes may add a widget area that can be utilized to add widgets that can use. Such as picture text box and other elements. It can even break into multiple columns that can be utilized for all types of purposes. At the end of the day, the footer is one of the major elements when it comes to any WordPress site.

Now we get into editing and adding some elements onto the Footer of your WordPress site. Let us begin with the basics of adding and editing the text inside the footer. Just for a simple understanding of our users. Here’s a couple of reasons why you might be interested in wanting to add and edit the WordPress footer texts.
Why integrate texts on the footer?
- You can let the users be aware of the ownership by adding a simple copyright section in the footer
- Also helps with branding and promoting your company through credits inside the footer
- Lastly, you can include your site’s privacy policy in the footer which is something very important these days.
You can begin to add these elements simply by adding the codes to display them in the footer. Check out the visuals below to get a simple step-by-step instruction.
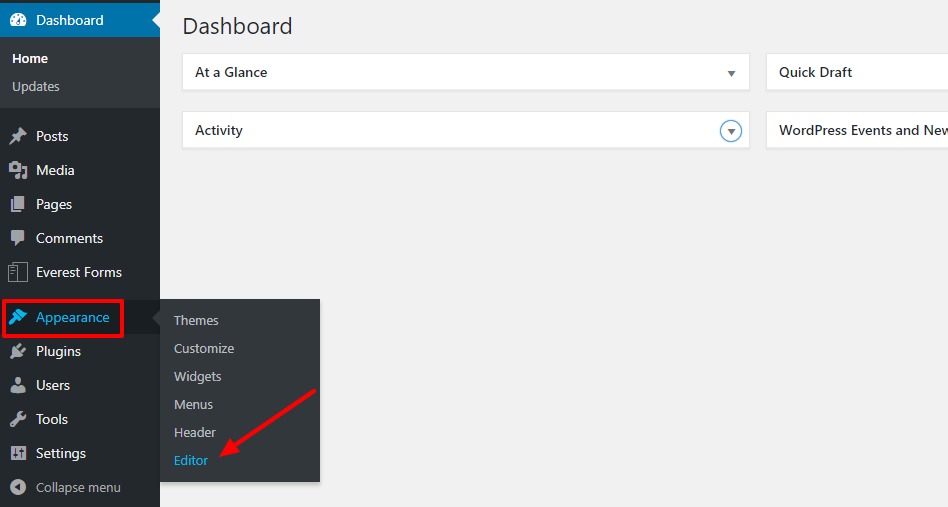

First log into your WordPress account then find the option for appearance and click on the editor.
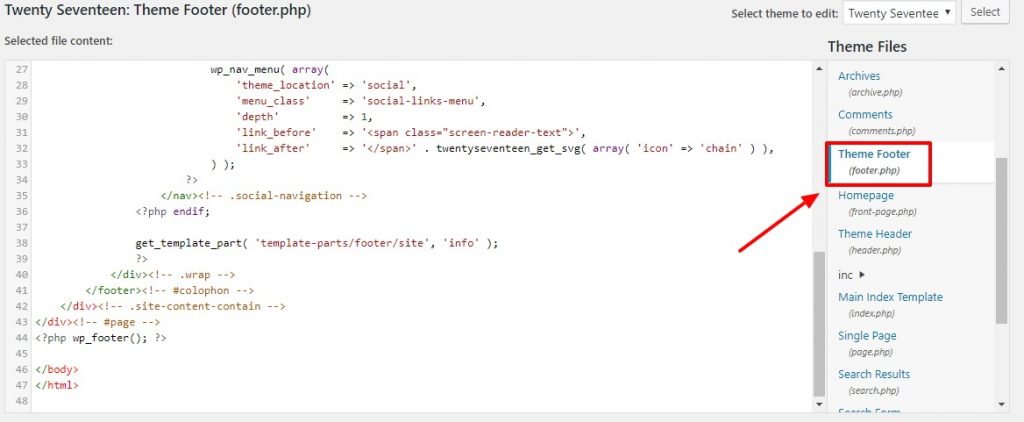

You will then be redirected to the edit themes page. Now take a look to the right-hand side and choose the option in the Theme Footer to customize the codes in footer.php.
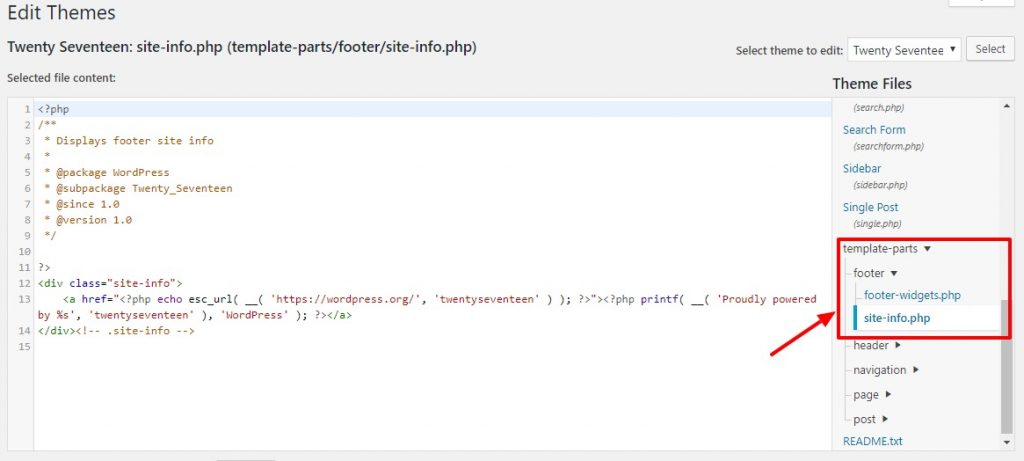

A little sweet tip. While you can find the codes right here on most themes, some might have added it to a different section. In the theme-Twenty-Seventeen that we are using. You have to go to the Template-Parts then on Footer and again on site-info to display the code to be customized.
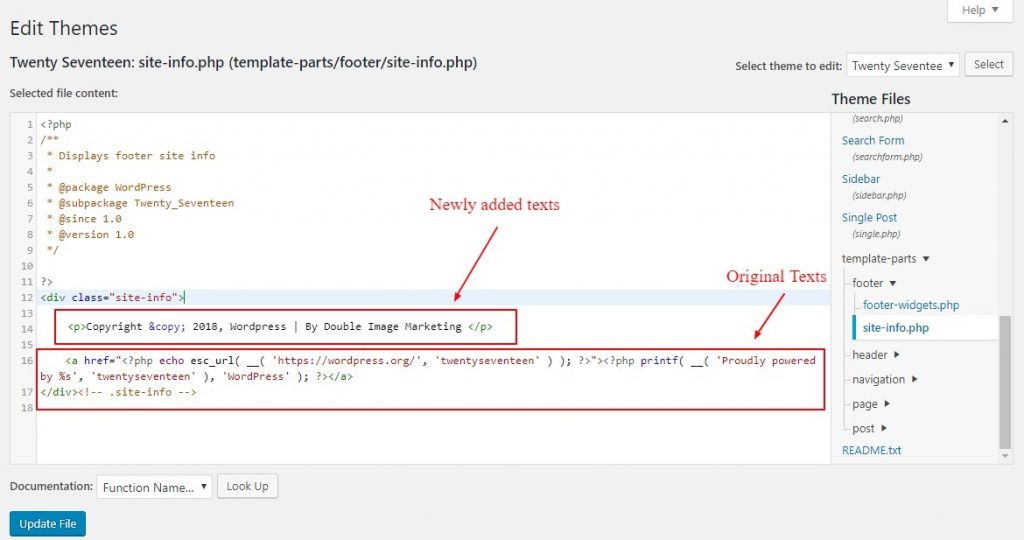

Now that we have found the codes we are going to change, go ahead and edit them. Echo your links and add everything that you want in there. Here’s a small example of how the codes should look after you’ve finished up. After all said and done make sure to click Update.


You can then proceed to view the footer on the live site. The newly added edits will be displayed in the footer section like the one we displayed above. In the image above you can see our company is displayed as the creditors. Of course, this won’t be the case for you. You can add whatever information you would like displayed there.
Adding Widgets to Your WordPress Website
Now that we are adding all the information and extra details we desire. We’re going to begin adding some simple widgets on the WordPress footer. We’ll start off by showing you how to edit the WordPress footer section.
SIDE NOTE:
Here’s just to show the users, we are using a footer widget area friendly theme -Astra Theme. We will begin by logging into our WordPress site and redirecting over to the dashboard.
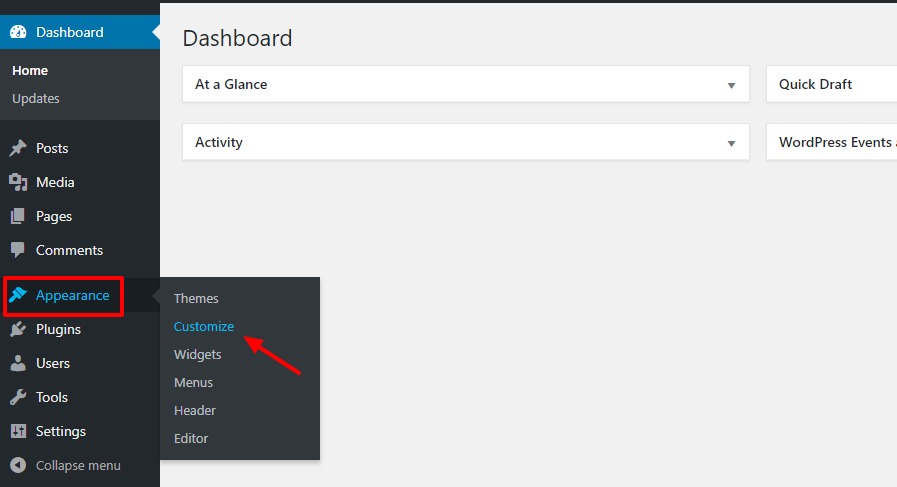

You can now go ahead and follow the image about we click on Appearance and then we proceed by clicking Customize. This will redirect you to the theme customizer.
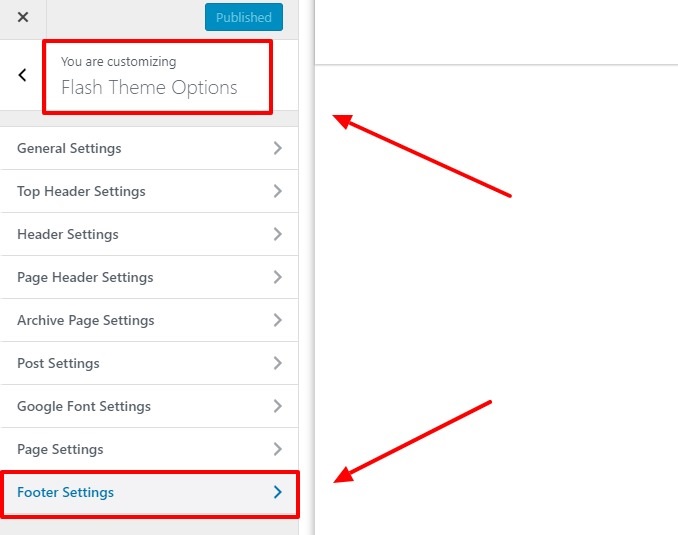

Now we can go ahead and select the Footer Settings. This will display the footer options that we have available that the theme has provided to the users.
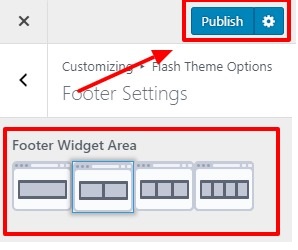

For the free version of the theme we can add up to about Four Widgets. So then we’ll go ahead and select the number of the footer sidebars that you want and then we proceed by clicking Publish to save the changes.
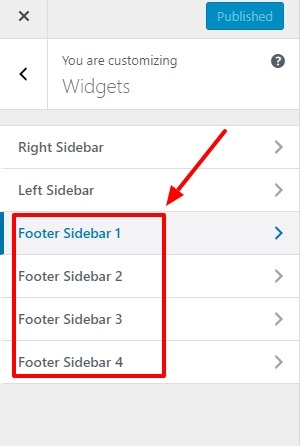

Once we have done this we can now go head and add the widgets. Well go to the Widget section on the theme customizer. You can go ahead and select the sidebar where you want to add the widgets and add away to your leisure.
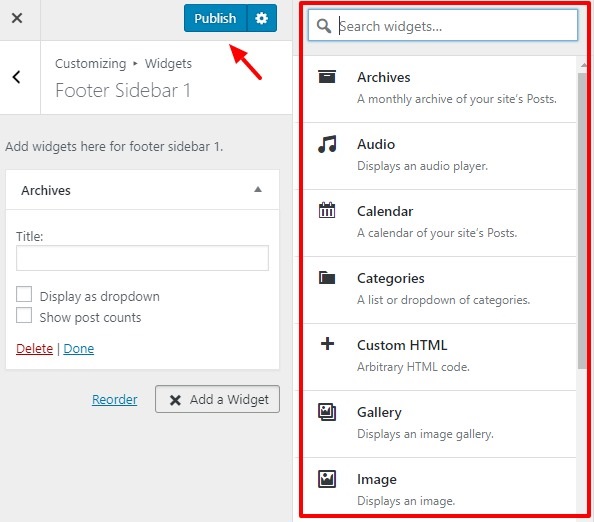

Last but not least you can add widgets. You can go ahead and type the widgets that you want into the search bar or just take a look around inside and see what would be the best fit for you. You can then reorder them by simply clicking and dragging them around once you’ve achieved your desired results click that small Publish button. Also a small pro tip you can remove and widget that you don’t like just by clicking the red delete option.
This then brings an end to this tutorial on how to edit the WordPress footer and the additional information of adding text and widgets into the footer. We wish by now that you have a general understanding of how you can do this by yourself. So go ahead and give this a shot yourself.


